It's Back to School at Papercraft Star this week! PCS is hosting a Back to School challenge and you need to get out your cricut or die cuts for this one!! You have until Noon EST September 4th to submit your entries for this challenge and don't be late or I'll send you to the Principal's office!! Homework: Get over to the Papercraft Star blog and place your votes Saturday September 4th through Tuesday September 7th!!
I have to admit that I struggled with this challenge a bit as my children aren't old enough to start school yet! Finally, after much thought, a light bulb went off in my head.... I will do a layout on what she wants to be when she grows up! I set down with my 3 year old and asked away! Then the fun began!
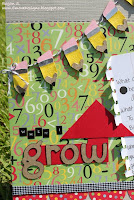
I just love the way this layout turned out! For the patterned paper, I used DCWV's Grade School stack as I loved the colors and patterns! I created the border at the bottom of the page using ribbon and a circle punch!
This was the fun part! After looking at my Locker Talk cricut cartridge and seeing the pencil, I knew I had to do this cute banner at the top! Isn't it fun? I used crackle accents to give the body of the pencil more character and used baker's twine as the string!
For the title I used my Cuttin' Up cricut cartridge to cut out the word "grow" using some cardboard from the back of a paper pad. I used my DYMO label buddy to spell out the words "When I" and I hand cut the arrow for "up" to complete my title! I used notebook patterned paper and my Stampin' up! Spiral punch to make the fun journaling spot!
The journaling reads:
What do you want to be when you grow up?
A Doctor
What does a Doctor job?
To help babies and big girls
check heartbeats
When your done with your check-up
you get medicine for babies and big girls
....and finally I did some faux stitching to finish off the top of the layout, added a cute picture of my DD, a fun flower with a die cut button and chipboard 3 in the center, and journaled the date by using a file tab from the office section!
Measurements:
1) Green patterned paper to 7 1/4 X 12, black photo mat to 4 1/4 X 6 1/4, and notebook patterned paper to 3 7/8 X 5 5/6
2) Cut pencil and pencil layers out at 1 1/2 inches out of yellow, silver, pink, black and brown packaging using the Locker Talk cricut cartridge; Cut "grow" out of brown packaging at 1 1/2 inches using the Cuttin' Up cricut cartridge and a button out of red cs using the sizzix buttons #5 die.
3) Punch 7 circles using a 1 3/4 inch circle punch and spiral punch the notebook patterned paper.
4) Adhere the 7 circles approx. 1 3/4 inches from bottom of the page
Supplies:
Paper: Going Gray textured card stock, Real Red, YoYo Yellow, Pretty in Pink, and Basic Black by Stampin' Up; Silver card stock by American Crafts
Patterned Paper: The Grade School Stack by DCWV and notebook patterned paper by Me&My Big Ideas
Ink: Black stampin' write journaler by Stampin' Up!
Tools: Cricut, Locker Talk cartridge, Cuttin' Up cartridge, BigKick, Buttons #5 die, Spiral punch & 1 3/4 inch circle punch by Stampin' Up!, DYMO Label Buddy with black tape,
Other: Black Wilton Baker's Twine, Lt weight brown packaging, office tab dividers, yellow silk flowers, black & white hounds tooth ribbon, and black chipboard "3"


9 comments:
This is so very charming, and detailed ! My favorite is that pencil pennant, I know people are going to love that. I was pretty excited to put this up on the Papercraft Star blog, it is outstanding !
Regan, this is so adorable. That is just about the cutest banner I have EVER seen. I just love love love this. You knocked this one outta the park girl!
Super super cute! I agree! Great banner! I love the sweet things kids say! Great job on this challenge!
Adorable! Lovelovelove that pencil bunting!
adorable, regan! i looooove the pencil banner, so cute!! thanks for sharing and have a great weekend! *hugs* steph :)
love the pencil banner - So adorable! :) have a great labor day weekend!
~Suzy
This is absolutely adorable Regan! I so love that you gave everyone the directions too...they are lots of people out there that need great ideas and help putting together such a sweet layout!
Thank you Ladies! The pencil banner was a lot of fun to make and it was a blast to hear what my daughter had to say! Have a great weekend!
Post a Comment