Showing posts with label Silhouette SD. Show all posts

Thursday, May 10, 2012

Better Late Than Never!

Here are a couple of videos from several weeks ago of the mini album I finished and some other projects I worked on.


Hopefully you will see more from me soon!
Regan

Wednesday, December 7, 2011

Oh Christmas Tree - Papercraft Star

This week at Papercraft Star, the challenge is to include a tree somewhere on your project. We have also provided this lovely inspiration photo that is always use if you choose.


I just love Christmas but I have to say it seems to be getting here too quickly! This year has flown by!! For the challenge this week, I created a Christmas card. I am always inspired by multi-media projects on canvases or in art journals, so that was some of my inspiration for this card.


I used the Text Writing Backgrounds CMS digital sheet from The House Across The Bay to create my Christmas tree. First I sprayed it with Spanish Moss and Wheatfields glimmer mist to give the image a green and shimmery look, once dry I punched 4 Scallop circles, inked the edges with walnut stain and cut them apart. Layer them up, fluff your scallops and voila, a tree! 


I typed my sentiment out on my vintage typewriter, cut them out, inked them and added an outline. The snowy hills were created from a label that I cut out on my Silhouette, cut apart, inked with tea dye distress ink and covered with frost white all purpose ink for shimmer. I am pleased with the way it turned out, and I think it definitely has a similar feeling to a mixed-media piece. 

I had some leftover inspiration, so here is an additional card for you.....


I hope you will leave a comment or any questions you may have below! Stop by the Papercraft Star blog and play along with us! Link up your projects by 6:00am EST Monday December 13th for your chance to win! Also, every Tuesday on the PCS blog we give a free digital image from THATB!

Thank you for stopping by!
Regan


Punched Tree Card Supplies:
THATB: Text Writing Backgrounds CMS 141
Card Stock: White Printer card stock by Georgia Pacific, cream - unknown, and Crumb Cake by Stampin' Up!
Pattern Paper: Signature Christmas by My Minds Eye
Ink: Frost White all purpose ink by Fantastix, Walnut Stain & Tea Dye distress inks by Ranger, Pure Black Millennium pen (MS-01) by ZIG and White gel pen by Pilot Choose.
Tools: Typewriter, computer, printer, scallop circle punch by Stampin' Up!, Silhouette SD, label cut and scissors
Other: Snowflake button, and Spanish Moss & Wheatfields glimmer mist by Tattered Angels.


Misted Tree Card Supplies:
THATB: Text Writing Backgrounds CMS 141
Card Stock: White Printer Cardstock by Georgia Pacific and going gray by Stampin' Up!
Ink: Chocolate Chip by Stampin' Up!, frost white and silver all purpose ink by Fantastix for shimmer and old olive stampin' write marker by Stampin' Up!
Tools: Silhouette SD, Merry Christmas Tree cut, Big Kick, Swirls embossing folder by Tim Holtz, snowflake punch by Stampin' Up! and Scissors
Other: Spanish Moss, Wheatfields & iridescent gold glimmer mist by Tattered Angels and a button

Wednesday, November 30, 2011

Welcome Little One - Papercraft Star

First off, today is my oldest daughter's 5th Birthday! I can't believe she is five already, time has flown by! Baby girl, I am so blessed to be your Mom. You have brought my life more love and joy then you will ever know. Have a very Happy Birthday, I hope you have an incredible day! Love you!

Okay, now back to work. lol :) I hope each and every one of you had an amazing Thanksgiving!

This week Papercraft Star has another fabulous challenge for you, a sketch by the talented Kim Duran.


Such a wonderful sketch, and so inspiring! 
I was also inspired by this crib bedding.


Here is what I created.


For this card, I cut the Airplane with Banner using my Silhouette SD. The cloud is hand drawn and cut out by me. I used the White Grunge Squares from the Card Makers Series by The House Across The Bay. I did change the image by tinting it blue in Picasa 3 and then printing it out. Just like before when I printed the image in Sepia, this allows you to customize your digital images for more use.


I punched the top corners of the card using the scallop corner punch on my corner chomper. I also did some fun faux stitching and doodling to add more interest to the card. I love the way it came out and I hope you do also!

Thank you so much for stopping by,
Regan


Supplies:
THATB: White Grunge Squares CMS 139
Card Stock: Going Gray by Stampin' Up! and white printer card stock
Pattern Paper: Red from Scrap box - company unknown possible DCWV
Ink: Chocolate Chip by Stampin' Up!, Tumbled Glass, Tea Dye & Fired Brick distress inks by Ranger, and Pure Black (MS-01) Millinnium pen by ZIG.
Stamps: Nursery Necessities by Stampin' Up!
Tools: Silhouette SD, Airplane with banner cut, and scallop corner punch on corner chomper by We R Memory Keepers
Other: Striped ribbon by Stampin' Up!, Red button, and string from coffee stained tag by Kraft Outlet

Wednesday, November 9, 2011

Merry - Papercraft Star

Wow, this year is just flying buy! Thanksgiving is around the corner and before we know it - Christmas!!

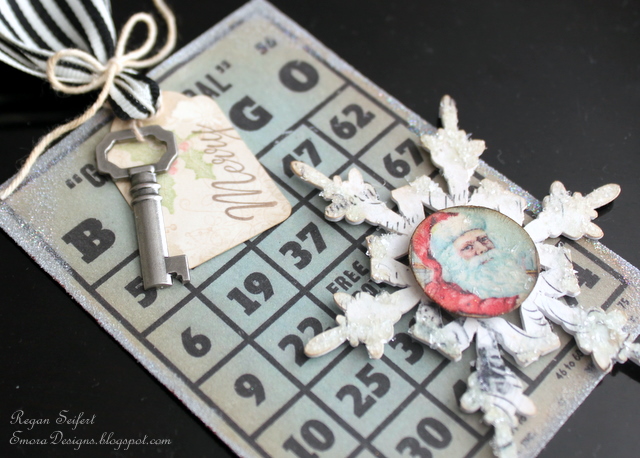
The challenge this week at Papercraft Star is to include a number, so I chose to make a Christmas tag.


For the base of the tag I used a digital bingo card by Kenner Road that I purchased at 2peas. The beautiful snowflake is a cut from my Silhouette SD out of a background from the CMS text writing backgrounds 141 digi sheet by The House Across The Bay. I then cut several more snowflakes out of white cardstock and glued them all together to make a thicker snowflake. 


I popped the snowflake off the tag to add some dimension. I then stamped on a little coffee stained tag that I purchased from Kraft Outlet and added a key by K&Company. I used Stampin' Up! ribbon at the top tied with string from a coffee stained tag to add more color and interest.


I punched the Santa out of the Christmas Squares digi sheet 055 (by THATB) using a 1" circle punch and then popped him up in the center of the snowflake. I added glossy accents and glitter glass to give a snow & ice look to the snowflake. The tag is inked around the edges with silver Encore ink, heat & stick powder and glitter for a winter feel. I of course inked the edges of everything with tea dye and/or walnut stain - I can't help myself!

I hope that you enjoyed my project today and will join us for Challenge 70 at Papercraft Star! You have until 6:00am EST on Monday November 14th to upload your projects for your chance to win prizes from The House Across The Bay!


Thank you for stopping by,
Regan

NOTE: Please be very careful when using glitter glass as it is little slivers of glass - keep away from your children and pets!

Supplies:
THATB: CMS text writing backgrounds 141 and Christmas Squares 055
Cardstock: White printer cardstock
Ink: Metallic silver Encore ink, Versamark, tea dye & walnut stain distress ink by Ranger, and ruby red & old olive stampin' write markers by Stampin' Up!
Stamps: Four Holidays & Serene Snowflakes by Stampin' Up! and Holly Stamp (unknown)
Tools: Silhouette SD, Snowflake cut, 1" circle punch by Stampin' Up!, heat gun and standard hole punch
Other: Coffee stained tag by Kraft Outlet, key by K&Company, glossy accents & crackle accents by inkssentials, clear embossing powder by Martha Stewart, Heat & Stick powder by Stampin' Up!, glitter glass, dazzling diamonds ultra fine glitter by Glitterex corp., black striped ribbon by Stampin' Up!, and Odds & Ends Vintage Bingo & Lotto cards by Kenner Road for 2peas in a bucket.

Wednesday, November 2, 2011

Thankful - Papercraft Star

Hi, I hope everyone had a safe and fun Halloween! This week at Papercraft Star, the challenge is to include some type of flourish on your project. Today I have a couple of fall inspired thank you cards to share with you. 


I used kraft cardstock for the base of my card and cut my main images (scallop circle, circle and flourish tree) using my Silhouette SD. I cut the flourish with my Big Shot and cut it apart to give the flourish a new look. The circle in the middle of the scallop is cut from the Text Writing Backgrounds Card Makers Series 141 from our sponsor The House Across The Bay.


I then added a button tied with some string from a tag and added a leaf that I had left over from my fall card a couple weeks ago, it too was cut using my Silhouette.

I was so inspired that I decided to make two cards.


I cut a banner shape to put my main images and added the same embellishments as the other card. For texture and interest I added some cord and some staples. 


I hope you enjoyed my projects today and are inspired to play along with us this week at Papercraft Star! For your chance to win prized from our sponsor The House Across The Bay, please have your entries linked up on the PCS blog by 6:00am EST on Monday November 7th.

Thank you for stopping by today!
Regan

Silhouette Cuts:
Nested Scallops - cut at 2.375 & 2.000
Nested Circles - cut at 2.015 & 1.705
Flourish Tree - cut at 1.590 X 1.145 & 1.865 X 1.340

Supplies:
THATB: CMS text writing backgrounds 141 (circles) and Grunge 101 ATC 023 (leaf)
Cardstock: kraft by The Paper Studio
Pattern Paper: Pumpkin Pie by K&Company and Fall in Love by My Minds Eye
Ink: Walnut Stain, Tea Dye and Fired Brick distress inks by Ranger, and chocolate chip marker by Stampin' Up!
Stamps: Much Appreciated & Holiday Best by Stampin' Up!
Tools: Silhouette SD; Cuts - nested circles, tree flourish, nested scallop circles, and leaves; stapler, xyron create-a-sticker model 150; corner chomper 1/4' & 1/2' corner rounder; Big Kick; and flourish sizzlet
Other: Buttons, string from tag, braiding cord by Horizon Group USA, and white gel pen by Pilot CHOOSE

Wednesday, October 12, 2011

Fall Leaves - Papercraft Star challenge #66

Hello creative friends!! It is an exciting day today... why you ask?! Not only is today my birthday, but it is also time for another challenge at Papercraft Star!!

I love earth tones and fall colors so this weeks challenge at PCS was perfect! I chose to make a card using the 4 inch text writing background squares from the card makers series (141) and the Grunge 101 ATC sheet (023) from our wonderful sponsor The House Across The Bay.

I used a Tim Holtz mask on the piece (Totally inspired by Jan of PCS) I used from the 4 inch text writing background squares to add some dimension to the background. I used ink, glimmer mist and water to get a more distressed/weathered look.

The Grunge 101 ATC sheet was perfect to cut out these tiny leaves! I used my new Silhouette SD that I actually won in a giveaway to cut these cuties out!! The great design was already there, I just added distress inks to get a variety of colored leaves and added a bit of crackle accents with my finger for texture.

I had so much fun making this card that I even decorated the back and inside of the card!


I just love how it turned out! A beautiful card for a fall birthday or wedding, or just to tell someone how grateful you are to have them in your life! 


To participate in this weeks challenge, please link up your projects by 6:00am EST on Monday over at Papercraft Star's Blog. Be sure to include a leaf on your project!

a little inspiration....

I am so glad you stopped by today! Please leave a comment and let me know you were here. 

Have a wonderful week,
Regan


Supplies:
THATB: 4 inch Text Writing Background Squares the card makers series 141 and Grunge 101 ATC sheet 023
Card Stock: White Printer card stock
Pattern Paper: Kay's Autumn by Me & My Big Ideas
Ink: Tea Dye, Walnut Stain, Fired Brick and Wild Honey distress inks by Ranger
Tools: Silhouette SD, Computer, Printer, hot glue gun, BigKick, and Lots Of Tags sizzlets by Stampin' Up!
Other: Tim Holtz Regal mini mask, Ivory pleated decorative trim by Hobby Lobby, Burlap Ribbon from Wal-Mart, Brown Tulle from Joann's, water, crackle accents and Wheatfields glimmer mist by Tattered Angels.