Showing posts with label Christmas. Show all posts

Wednesday, December 14, 2011

Ornaments, Baubles and Bells....Oh My!

Hi there, I hope you are all having a wonderful week. Things around my house are pretty crazy in preparation of the upcoming holidays. I hope things aren't too crazy for you!

Today Papercraft Star opened another challenge! This week your challenge is to include a bell or ornament somewhere on your project, and they have provided us with this beautiful photo as inspiration. (photos are always use if you choose)


I decided to take this challenge literally by creating a couple of ornaments.


I used a glass ball ornament I purchased at Michael's some time ago as my base. I then printed Victorian Ads II by The House Across The Bay on tissue paper (I simply taped the tissue paper to printer cardstock and ran it through my printer) and mod podged it on in sections. After the ornament was dry, I sprayed them with Iridescent Gold glimmer mist to add a little shimmer.


Once that dried I decorated the ornaments with some seam binding I colored with my new Lindy's Starburst sprays, some elements cut from holiday picks and a feather for a little flair!

I think they are beautiful and I hope you enjoyed my post today!

Hop on over to the Papercraft Star blog and play along with us. You have until 6:00am EST on Monday December 19th to link up your projects for your chance to win!

Thanks for stopping by,
Regan

Supplies:
THATB: Victorian ads II #184
Paper: White tissue paper and printer cardstock
Tools: Hot glue gun, heat gun, computer, printer, tape, and an old paint brush
Other: Holiday picks, white seam binding by Hug Snug, glass ornament (2.63in/67mm), black feathers, Iridescent Gold glimmer mist by Tattered Angels, Mod Podge, Gator Gumbo Olive & Poinsettia Red Gold Starburst sprays by Lindy's stamp gang.

Wednesday, December 7, 2011

Oh Christmas Tree - Papercraft Star

This week at Papercraft Star, the challenge is to include a tree somewhere on your project. We have also provided this lovely inspiration photo that is always use if you choose.


I just love Christmas but I have to say it seems to be getting here too quickly! This year has flown by!! For the challenge this week, I created a Christmas card. I am always inspired by multi-media projects on canvases or in art journals, so that was some of my inspiration for this card.


I used the Text Writing Backgrounds CMS digital sheet from The House Across The Bay to create my Christmas tree. First I sprayed it with Spanish Moss and Wheatfields glimmer mist to give the image a green and shimmery look, once dry I punched 4 Scallop circles, inked the edges with walnut stain and cut them apart. Layer them up, fluff your scallops and voila, a tree! 


I typed my sentiment out on my vintage typewriter, cut them out, inked them and added an outline. The snowy hills were created from a label that I cut out on my Silhouette, cut apart, inked with tea dye distress ink and covered with frost white all purpose ink for shimmer. I am pleased with the way it turned out, and I think it definitely has a similar feeling to a mixed-media piece. 

I had some leftover inspiration, so here is an additional card for you.....


I hope you will leave a comment or any questions you may have below! Stop by the Papercraft Star blog and play along with us! Link up your projects by 6:00am EST Monday December 13th for your chance to win! Also, every Tuesday on the PCS blog we give a free digital image from THATB!

Thank you for stopping by!
Regan


Punched Tree Card Supplies:
THATB: Text Writing Backgrounds CMS 141
Card Stock: White Printer card stock by Georgia Pacific, cream - unknown, and Crumb Cake by Stampin' Up!
Pattern Paper: Signature Christmas by My Minds Eye
Ink: Frost White all purpose ink by Fantastix, Walnut Stain & Tea Dye distress inks by Ranger, Pure Black Millennium pen (MS-01) by ZIG and White gel pen by Pilot Choose.
Tools: Typewriter, computer, printer, scallop circle punch by Stampin' Up!, Silhouette SD, label cut and scissors
Other: Snowflake button, and Spanish Moss & Wheatfields glimmer mist by Tattered Angels.


Misted Tree Card Supplies:
THATB: Text Writing Backgrounds CMS 141
Card Stock: White Printer Cardstock by Georgia Pacific and going gray by Stampin' Up!
Ink: Chocolate Chip by Stampin' Up!, frost white and silver all purpose ink by Fantastix for shimmer and old olive stampin' write marker by Stampin' Up!
Tools: Silhouette SD, Merry Christmas Tree cut, Big Kick, Swirls embossing folder by Tim Holtz, snowflake punch by Stampin' Up! and Scissors
Other: Spanish Moss, Wheatfields & iridescent gold glimmer mist by Tattered Angels and a button

Wednesday, November 23, 2011

Faux Scrabble Tile Necklace - Papercraft Star

Hi There! This week at Papercraft  Star ANYTHING GOES!! :) I always enjoy these challenges because we get to see such amazing work from all of our participants!

By request of Miss Jan, I made some jewelry featuring the beautiful digital images from The House Across The Bay. She originally requested a bracelet but I didn't have all the stuff to make the type of bracelet I wanted. Instead I made scrabble tile necklaces using faux scrabble tiles I found at my local Hobby Lobby and the Christmas Squares digital sheet.

Enough rambling, here it is....


I inked the edges of the tiles; the poinsettia with gold Encore ink and the Santa with walnut stain.
I added some gold seed beads to the center of the poinsettia with glossy accents to add some texture and dimension to the piece.  I think they both turned out lovely. 


Jan, if you would like one of these please private message me with which one you would like and your mailing address. :)

I hope you will swing by the Papercraft Star blog and join us for this fun challenge. You have until 6:00am EST on Monday November 28th to link up your beautiful creations... See you there!!

Thank you for stopping by and
Have a blessed Thanksgiving!
Regan

Supplies:
THATB: Christmas Squares 055
Ink: Metallic Gold Encore Ink and Walnut Stain distress ink by Ranger
Tools: Paint brush, scissors, eye hook and tweezers
Other: Mod Podge, glossy accents by Inkssentials, ball chain by Tim Holtz and gold seed beads.

Saturday, November 19, 2011

Christmas Wreath

Today I thought I would share a Christmas card I made inspired by the Christmas Planners I made for a swap.

Here are the planners...


and here is the card....


I made this card with the same general idea, but instead of corrugated cardboard I used kraft cardstock. I ran the cardstock through my big kick with the wood grain embossing folder by Tim Holtz, then I  dry brushed it with white acrylic paint to give it a white washed look. I punched the branches out of scrap paper using the bird and branch punch by Stampin' Up! I traced a circle onto the card and layered my branches up around the circle to create a wreath. Add a bow and some small embellishments and your done! It kind of reminds me of a front door. :)

I hope you enjoyed my post today!
Thank you so much for stopping by,
Regan

Supplies:
Cardstock: kraft by The Paper Studio
Pattern Paper: green scraps in different shades and patterns
Tools: Bird and Branch punch by Stampin' Up!, Big Kick, wood grain embossing folder by Stampin' Up!, paint brush, and something round like a lid to trace a circle.
Other: white acrylic paint, red sequins, gold ribbon and glossy accents by Inkssentials

Wednesday, November 16, 2011

A Thank You Card - Papercraft Star

Well, it's Wednesday and that means another challenge has opened at Papercraft Star! This week the challenge is to create a thank you card. We have also been provided with this beautiful inspiration photo that is use if you choose.


I was really drawn to the glowing flames of the candles and the pumpkins in the photo.... 

Here is what I came up with.

The inspiration photo had a softness to it, so I really wanted to use vellum for the background rather than pattern paper. I dry embossed the vellum and added some color with Wild Honey Distress ink and stitched the piece on with my sewing machine. A simple banner is home to the sentiment.


I used the Romantic Lace digital sheet from The House Across The Bay and an oval punch to create my pumpkin base. I inked around the edges of the ovals with Wild Honey to achieve the look of the glow from the candles in the photo. For the stem/leaf I used the Halloween Backgrounds sheet and the boho blossoms punch by Stampin' Up!. I used some wire I cut from the little Prima rosettes and wrapped it around my paper piercer for a cute little vine. 

I was having so much fun with the vellum and layout that I ended up making a couple of other cards.
First, I made this beautiful yet simple Christmas card.


For this card I decided to put the sentiment behind the vellum for a soft snowy look. The snowflake was punched out of the Write Stuff Backgrounds digi sheet using the snowflake punch by Stampin' Up! Some Frost White all purpose ink adds a little shimmer to the vellum and snowflakes.


Then I thought, how cute would it be to add confetti behind the vellum....


I hope my post has inspired you to create something today. Stop by the Papercraft Star blog and play along with us! You have until 6:00am EST on Monday November 21st to link up your entries for our challenge this week. I look forward to seeing your projects.

Thank you for stopping by,
Regan


Thank You Card Supplies:
THATB: Romantic Lace 098 and Halloween Backgrounds 173
Card Stock: Kraft by The Paper Studio and Going Gray By Stampin' Up!
Inks: Walnut Stain and Wild Honey distress inks by Ranger
Stamps: Much Appreciated by Stampin' Up!
Tools: Big Kick, dashes texture plate by Sizzix, sewing machine, oval punch by Fiskars, boho blossoms punch by Stampin' Up!, Computer and Printer
Other: green wire "stem" from Prima rosette and Vellum by Stampin' Up!

Christmas Card Supplies:
THATB: Write Stuff Backgrounds 031 and/or Romantic Lace 098 (printed in Sepia)
Card Stock: Kraft by The Paper Studio and Going Gray By Stampin' Up!
Ink: Walnut Stain & Tea Dye distress inks by Ranger, Chocolate Chip by Stampin' Up!, and Frost White all purpose ink by TSUKIENEKO for Fantastix
Stamps: Four the Holidays by Stampin' Up!
Tools: Big Kick, polka dot daisies texture plate by Sizzix, snowflake punch by Stampin' Up!, sewing machine, computer and printer
Other: Vintage Button and Vellum paper by Stampin' Up!

Birthday Card Supplies:
Card Stock: Going Gray and Tempting Turquoise by Stampin' Up!
Pattern Paper: random from scrap box
Ink: Walnut Stain & Wild Honey distress inks by Ranger and Chocolate Chip by Stampin' Up!
Stamps: Birthday Whimsy by Stampin' Up!
Tools: Big Kick, dashes texture plate by Sizzix, sewing machine, standard hole punch (for confetti), computer and Printer
Other: General Birthday adhesive chipboard sticker by K&Company and Vellum paper by Stampin' Up!

Wednesday, November 9, 2011

Merry - Papercraft Star

Wow, this year is just flying buy! Thanksgiving is around the corner and before we know it - Christmas!!

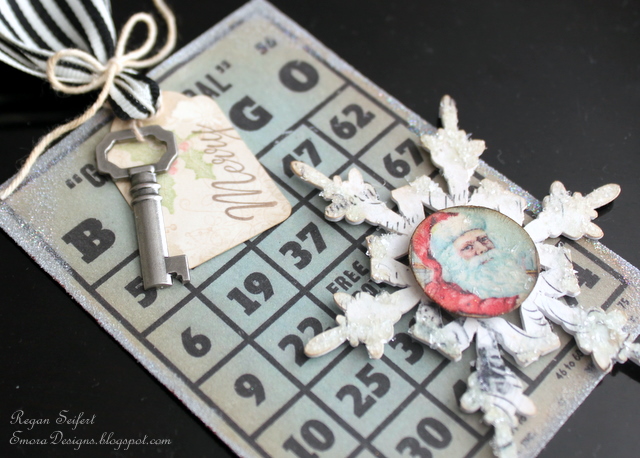
The challenge this week at Papercraft Star is to include a number, so I chose to make a Christmas tag.


For the base of the tag I used a digital bingo card by Kenner Road that I purchased at 2peas. The beautiful snowflake is a cut from my Silhouette SD out of a background from the CMS text writing backgrounds 141 digi sheet by The House Across The Bay. I then cut several more snowflakes out of white cardstock and glued them all together to make a thicker snowflake. 


I popped the snowflake off the tag to add some dimension. I then stamped on a little coffee stained tag that I purchased from Kraft Outlet and added a key by K&Company. I used Stampin' Up! ribbon at the top tied with string from a coffee stained tag to add more color and interest.


I punched the Santa out of the Christmas Squares digi sheet 055 (by THATB) using a 1" circle punch and then popped him up in the center of the snowflake. I added glossy accents and glitter glass to give a snow & ice look to the snowflake. The tag is inked around the edges with silver Encore ink, heat & stick powder and glitter for a winter feel. I of course inked the edges of everything with tea dye and/or walnut stain - I can't help myself!

I hope that you enjoyed my project today and will join us for Challenge 70 at Papercraft Star! You have until 6:00am EST on Monday November 14th to upload your projects for your chance to win prizes from The House Across The Bay!


Thank you for stopping by,
Regan

NOTE: Please be very careful when using glitter glass as it is little slivers of glass - keep away from your children and pets!

Supplies:
THATB: CMS text writing backgrounds 141 and Christmas Squares 055
Cardstock: White printer cardstock
Ink: Metallic silver Encore ink, Versamark, tea dye & walnut stain distress ink by Ranger, and ruby red & old olive stampin' write markers by Stampin' Up!
Stamps: Four Holidays & Serene Snowflakes by Stampin' Up! and Holly Stamp (unknown)
Tools: Silhouette SD, Snowflake cut, 1" circle punch by Stampin' Up!, heat gun and standard hole punch
Other: Coffee stained tag by Kraft Outlet, key by K&Company, glossy accents & crackle accents by inkssentials, clear embossing powder by Martha Stewart, Heat & Stick powder by Stampin' Up!, glitter glass, dazzling diamonds ultra fine glitter by Glitterex corp., black striped ribbon by Stampin' Up!, and Odds & Ends Vintage Bingo & Lotto cards by Kenner Road for 2peas in a bucket.

Tuesday, October 25, 2011

October Swaps for Your Paper Pantry

Hi, I hope that you are having a great week so far. This month I participated in a couple of swaps over at Your Paper Pantry. 

The first swap is called Many Things To Do and is hosted by Yolanda (yoliebean on YT). This month we were to create 3 Holiday organizers/journals (2 to swap & 1 for ourselves). Our challenge was to make the book with 25 pages or more, have labeled lists and to add our favorite recipe, go to gift or decor idea somewhere in the book.


I used capri sun boxes and white acrylic paint for the covers. To create the ornaments and wreaths, I used punches from Stampin' Up!, then I used my cinch to bind them. Find out more by watching the video HERE.

The next swap was for Baubles, Bangles & Beads hosted by me! This month we did a partner swap. We were to create a necklace for our partner using Tim Holtz products, and this is what I came up with for my partner Anna (afallas72 on YT). 


Find out more by watching the video HERE.
I hope you enjoyed my projects today!


Thank you for stopping by,
Regan

Saturday, July 23, 2011

Trim The Tree - Unscripted Sketches

It's time for Sketch it Saturdays at Unscripted Sketches!


For this sketch I created another 12X12 Christmas Layout.

For added interest, I hand stitched a pattern using pink thread onto the ornament die cut.


I used glossy accents and Bakers twine to create part of my title.


I enjoyed putting this layout together! It is a pretty quick & simple layout minus the time it took to hand stitch the ornament, that would be a good thing to do while watching TV with the family!

I hope you will share your creations with us! Link them up over at Unscripted Sketches!


Thank you for stopping by,
Regan


Supply List:
Card Stock: Whisper White by Stampin' Up! & Coordinations (dot)
Patterned Paper: Sweet Stitches, Newsprint & Afternoon Tea by Stampin' Up! and Morning Chirps from Paradise City collection by Prima
Ink: Tumbled Glass distress ink by Ranger, black fine tip permanent marker (acid free) by Sharpie
Tools: Eyelet Border punch by Stampin' Up!, BigKick, Ornament Ball die by Sizzix, pink thread & needle, and Paper piercer & mat (Stampin' Up!) 
Other: Blue&white baker's twine, Paper girl sticker market by The Girls' Paperie, Glossy Accents & Crackle Accents by Inkssentials, Shoebox glitter letter Thickers by American Crafts, and Tiara Accent Thickers by American Crafts

Saturday, July 16, 2011

Dear Santa - Unscripted Sketches

It is time for another Sketch it Saturdays sketch from Unscripted Sketches! I hope you are enjoying Christmas in July!

This week's sketch...

There is also a Piggy Back challenge this week.
Use wrapping paper somewhere on your project.

I chose to create a scrapbook layout for this challenge, with a Christmas theme of course! I used Tissue Paper, you know the kind you put in gift bags, on my project.


I attached the tissue paper to a piece of light weight chipboard using Mod Podge, I crinkled it up first. I inked around the edges of the page to add interest.


After that, it was just a matter of adding my photos and some fun embellishments!

I love the way the tissue paper background turned out and I hope to use it again on another project!

I hope you enjoyed my project today. Be sure to link your projects up over at Unscripted Sketches so we can take a peek at your creativity!

Thanks for stopping by!
Regan

Supply List:
Patterned Paper: Mi Casa stack by DCWV
Ink: Gold Encore ink, Tea Dye & Fired Brick distress inks by Ranger, and Old Olive & Basic Brown by Stampin' Up!
Stamps: Baroque Motifs by Stampin' Up! and Dear Santa stamp by Studio G
Tools: Hot glue gun, 
Other: white lightweight chipboard, tissue paper (gift wrap), Poinsettia's by Prima, Gold vintage button, 3 red buttons, green leaf pick (Michael's), Maya Road bingo pieces, Maya Road kraft enevelope, Large shipping tag, Zig Painty pen (gold) and Mod Podge (matte)

Tuesday, July 12, 2011

Use Your Stuff - Unscripted Sketches

Hi there! It is Christmas in July all month long at Unscripted Sketches. Stop by everyday for fun projects, tutorials, designer spotlights and a chance to win prizes!!

Today I am hosting the Use Your Stuff segment! I think all of us have that one stack of pattern papers that we love too much to use, or a special tag you received from a scrappy friend..... what about all the scraps, envelopes and cardboard you can't throw away because "we ARE going to use it!" ? I have a fun project that allows you the opportunity to USE YOUR STUFF!!

How about a December Daily / Junk Journal?
You know you have all the stuff laying around to make one.
Don't have chipboard? Go green and use cereal box!

In the video below I will share a few junk journals and a December Daily I have made and a chance for you to win a junk journal / December Daily of your own!


I hope you are inspired to Use Your Stuff today!
I will draw 2 lucky winners at the end of July, so don't forget to enter!  **CLOSED**

Below you will find the links mentioned in the video.

My YouTube:
http://www.youtube.com/watch?v=hf4Lc-uwU38

Yolanda:
http://www.youtube.com/user/yoliebean#p/u/13/CRqu6d2RBvs

Tangie's Junk Journal / composition book Tutorial:
http://www.youtube.com/watch?v=FpZ-tv5TsjM

Ali Edwards December Daily:
http://aliedwards.com/projects/december-daily/


Merry Christmas in July!
Regan

Saturday, July 9, 2011

Santa's Cuties - Unscripted Sketches

Hi! It is time for Sketch it Saturdays over at Unscripted Sketches.

Here is this week's sketch...


Since we are celebrating Christmas in July at Unscripted Sketches this month, I thought I would create a Christmas layout! It's so Hot here thinking of Christmas doesn't seem so bad... maybe snow? Ahhhh...


I flip flopped the sketch a bit to get the look I wanted. I dry brushed some white gesso onto my base to add some interest and to frame my main images. Other than that, it is a pretty simple layout. 

I hope you are enjoying Christmas in July so far! 

Also, I have a brand New blog button! I created it using a photo of my artwork and Picnik.com. Please check it out and let me know what you think. (It is in the sidebar to the left)

Thank you for stopping by!
Remember to Pour your "ART' out!
Regan

Get The Look:
Base - 12X12 inches
Black Mat - 8 1/8 X 8 1/2 inches (adhere to base 1 7/8 inch from bottom and 1/2 inch from right side.)
White Mat - 6 1/4 X 8 3/8 inches
Photos - 4X6 inches - 2

Supply List:
Patterned Paper: Night & Day, Presto Patterns and Jackpot designer series paper by Stampin' Up! and It's About Time Calendar cards 2 by LUXE designs.
Ink: Black fine tip permanent pen by Sharpie (Acid Free, smear proof & waterproof!) and White gel pen by Pilot CHOOSE.
Tools: Paint Brush (dry)
Other: Coffee stained tags from Kraft Outlet, Red Glitter letter stickers by gcd studios, Words sticker by Me & My Big Ideas, Puffy alpha stickers-black by The Paper Studio, and white gesso.

Monday, January 3, 2011

50th Anniversary Mini Album

Hi! Okay, so I posted this video on YouTube like 3 weeks ago but had it unlisted while I waited for permission to share! I now have permission to share this mini album, so here it is!


Please leave a comment and let me know what you think!
Thanks For Stopping by!
Regan

Saturday, January 1, 2011

Santa Tag

Hi! I hope that you all had a safe and wonderful New Year! I am here to share another project with you for I Brake For Stamps! Use coupon code SAVE10REGAN at checkout and save 10% off your order!

So I know some of you are sending out Christmas Thank You cards and I thought it would be cute to create a Thank you tag to attach to a small gift or tin of baked goods! I used the Santa Collage Quartersheet to create this cute & simple tag!


I just love the vintage feel of this stamp set! I hope that you will give this simple tag a try!
Thank you so much for stopping by!
Regan

Supply List:
Santa Collage Quartersheet from www.Ibrakeforstamps.com
Coffee stained tag from KraftOutlet.com
Chocolate Chip Ink by Stampin' Up!
Walnut Stain Distress Ink by Ranger
Vintage Lace
Green Button
copper wire
Ridinghood Red Taffeta Ribbon by Stampin' Up!
Garment Pin
Charm by Anna Massie


Thursday, December 30, 2010

A Christmas Thank You

Hi all, I hope that you all had a wonderful Christmas! Can you believe this year is almost over! Wow, time flies when your having fun! Well, I am here to share another project for I Brake For Stamps!! If you haven't checked them out, you need to!! Save 10% off your order when you use coupon code SAVE10REGAN at checkout!

I know it is a little late for Christmas cards but not too late for Christmas Thank You cards!!


I used the beautiful Fall/Winter Collage Sheet Set to create this card.


I wish you all a very Happy New Year! I hope your year is full of Love, laughter, great memories and good health! Thank you for stopping by!

Regan


Supply List:
Fall/Winter Collage Sheet by www.IBrakeForStamps.com
Always Artichoke & Whisper White card stock by Stampin' Up!
Kraft card stock by www.KraftOutlet.com
Basic Gray pattern paper
Scallop border punch by Stampin' Up!
Creamy Caramel, Close to Cocoa, Mellow Moss & Ruby Red Stampin' Write Markers by Stampin' Up!
Chocolate Chip Ink by Stampin' Up!
Pom Pom trim from Joann's
Pearl strand
Hot Glue Gun

Sunday, December 19, 2010

Papercraft Star - Holiday Hop


Merry Christmas and welcome to the Papercraft Star Tags (and more) of Christmas Blog Hop sponsored by Catherine Pooler. We are so happy you could join us for this special event! You should have arrived at my blog from Tracy, if that is not where you arrived from, then please join us at Papercraft Star to start the hop from the beginning so you don't miss a thing! You must be a follower of Papercraft Star, visit and leave a comment on all the blogs in order to be entered to win our fantastic Grand Prize!

During this hop we hope that you'll find a wealth of inspiration among the beautiful projects our Designers have created especially for you! To add to the fun, we've got fabulous prizes along the way at many of our Designer's blogs and you'll be entered to win a full month subscription to Club InBox by our generous sponsor Catherine Pooler, if you visit every blog and leave a comment with all of our Designers! You have until midnight (Eastern Time) on Saturday December 25, 2010 to leave all your comments and be entered to win the Grand Prize. We'll draw the winners of the prizes and announce them beginning Sunday December 26, 2010.

Now for my Tag of Christmas....


I created this tag using the Baroque Sizzix die by Tim Holtz. I used the die to cut a baroque shape out of Crumb Cake card stock and Deck the Halls Designer Series Paper, both by Stampin' Up!

Then I stamped the music score with Versamark ink and heat embossed it with Gold embossing powder. I stamped the tree using Whisper White Craft ink by Stampin' up! and then Heat embossed it with UTEE and then again with White embossing powder.


I used the negative from a chipboard letter from Stampin' Up!, ran my Walnut Stain Distress Ink pad over it, pressed it into my Versamark pad and then heat embossed it using UTEE. I backed the chipboard piece with vintage Christmas sheet music and cut a holly from the paper (I added Crystal Effects to it to make it sturdy) to add to the front corner.

I applied Olive Green and Timber Brown StazOn ink to the white tree using my finger to add some color and interest to the image. I did the same thing to the chip piece using the whisper white craft ink. I used the Scrollwork on the edge die as a mask and inked the tag using Walnut Stain distress ink.

Add a large Stampin' Up! Eyelet, some Kraft Taffeta Ribbon by Stampin' Up! and a grungy metal tag from KraftOutlet and your finished!


Merry Christmas to you and yours and thank you again for joining us for the Papercraft Star Tags of Christmas Blog Hop, your next stop on the hop is the talented Liz!


and now for the small print...

Supply List:

Sponsor Supplies:
Chipboard negative letter (retired)
Kraft Taffeta Ribbon (retired)
Crystal Effects
Whisper White Craft Ink
Deck the Halls Designer Series Paper
Lovely as a Tree Stamp Set
Warm Words Stamp Set
Large Eyelets

Other Supplies:
Vintage Sheet Music
White Embossing Powder by Martha Stewart
Gold Embossing Powder by Heat it up!
UTEE (Ultra Thick Embossing Powder)
Timber Brown and Olive Green StazOn Ink
Walnut Stain Distress Ink by Ranger
Heat Gun
Baroque Tim Holtz Alterations Die
Scrollwork Tim Holtz Alterations Die
Music Score Stamp by Stampendous
Grungy Round Metal Tag by www.KraftOutlet.com

Friday, December 17, 2010

I Brake For Stamps - Snowflake Accordion Album in Ornament Tin

Hi everyone! I just wanted to take some time to share a project i created for I Brake For Stamps using the Fall/Winter Collage Sheet. It is an ornament tin that houses an accordion album!


I used this window tin to house my accordion album. I punched two holes in the top of the tin using my cropadile, ran some lace through and then I had an ornament! I will warn you it's a little heavy!

Here is a close up of the IBFS stamped image through the tins window....


 The accordion album...
I inked all the edges of the patterned paper with Walnut Stain Distress Ink. I inked the stamped image with Tea Dye Distress Ink and then sprayed it with Wheatfields and Pearl Glimmer Mist.


Close up of Snowflake..
I stamped the image with versamark and then heat embossed it using Silver embossing powder. I stamped it twice more (just the snowflake section) and heat embossed it. I then cut the snowflake's different layers out and popped them up with pop dots to add dimension.


The snowflakes were sprayed with Fall Breeze, Patina and Pearl Glimmer Mist to add color and shimmer! I inked the smaller snowflake lightly with Walnut Stain to make it a tad darker. I love the way it came out!

Do some SHOPPING!! Visit http://www.ibrakeforstamps.com/ and enter coupon code SAVE10REGAN at checkout to save 10% off your order!

Please leave a comment and let me know what you think!
Thanks for stopping by!
Regan

Supply List:
Card Stock: Brown Shimmer card stock and Going Gray card stock by Stampin' Up!
Patterned Paper: My Minds Eye Signature Christmas
Ink: Walnut Stain and Tea Dye Distress Inks by Ranger and Versamark Ink
Stamps: Fall/Winter Collage Sheet by I Brake For Stamps
Tools: Heat Gun, Martha Stewart Score Board, Corner Rounder Punch, trimmer and Cropadile
Other: Wheatfields, Pearl, Patina and Fall Breeze Glimmer Mists by Tattered Angels, Lace, Silver Embossing Powder by Stamp N Stuff and Pop dots

Thursday, December 16, 2010

Papercraft Star - Fragment Charm Collage Tutorial

Fragment Charm Collage


Supply List:
Sponsor Supplies (Catherine Pooler - Stampin' Up!):
Crystal Effects
Deck the Halls Designer Series Paper
Paper Piercer
Craft and Rubber Scissors

Other Supplies:
Tim Holtz Fragment charm
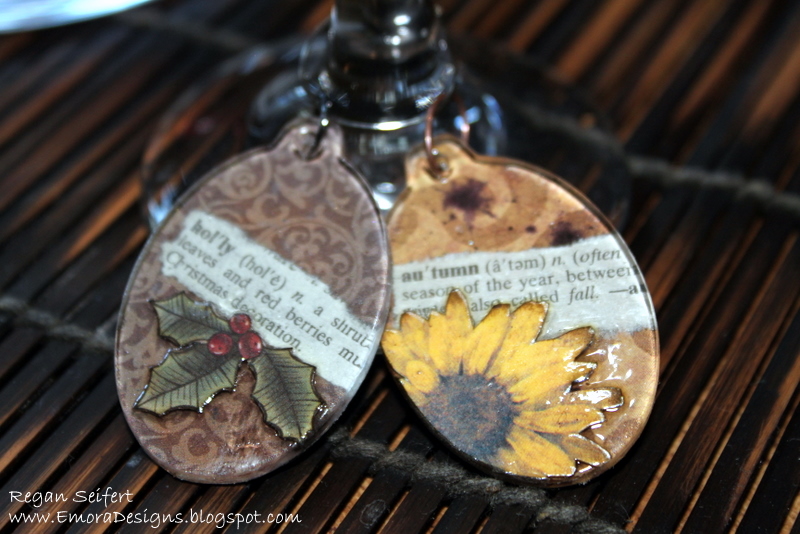
Dictionary
Nail file
Walnut Stain Distress Ink or Ink color of your choice
Crackle Accents by Inkssentials
Paint brush


Friday, December 10, 2010

Holly Jolly Christmas

Hi everyone!!

       I am back to share with you another card I made using stamps from I Brake For Stamps! I wanted to share this recessed frame card that I made using the wonderful Fall/Winter Collage Sheet!

I am always looking for ways to use a stamp in more than one way, this helps me to save money and get more mileage out of my stamps! When I saw the Fall acorn collage stamp, I knew instantly that I could use it for Christmas!!

Here is the image before...


and after......


I learned how to do the recessed card frame from Tracy!


Here's how I got the look....
I cut a piece of Very Vanilla Stampin' Up! card stock to 3 X 4 5/8
I stamped my Fall/Winter Collage Sheet image using versamark and then heat embossed it using gold embossing powder.
I colored in the leaves and acorns using the Old Olive Stampin' Write marker by Stampin' Up!
Then I inked around the edges using Walnut Stain Distress Ink by Ranger
Last but not least I added the red half back pearls as berries for my Holly!

I hope that you will give it a try!!

When you shop at I Brake For Stamps use my coupon code SAVE10REGAN to receive 10% off your order!

For more ideas and inspiration, check out the I Brake For Stamps Blog!

Thanks for taking a look,
Regan